
Newforma Konekt for Procore: Getting Started Tutorial
The Newforma Konekt Procore connector allows construction and design teams to communicate with each other in their everyday software by automating RFIs and submittals transfers, avoiding duplicate entries across platforms.
In this tutorial, you’ll learn how to configure the Procore connector in order to start creating and receiving RFIs and submittals.
It is also possible to elevate an issue in Newforma Konekt to a formal RFI in Procore. Newforma Konekt will automatically populate the RFI form, with additional information for more context, including the default viewpoint image, issue description, and issue due date (see Set up the Procore Connector for Creating Procore RFIs from Newforma Konekt).
What you’ll need
- A Newforma Konekt account and a Procore account.
- An Administrator role for the project (see Project Roles).
- Access to RFIs and submittals.
Step 1 – Install the Newforma Konekt app in your Procore account
To receive the Procore RFIs and Submittals, a Procore administrator must install the “Newforma Konekt” app in Procore.
- Log in to Procore.
- Select your preferred company.
- On the Procore company list page, click Select an App in the top corner, and then click Marketplace.
- Select a company and continue.
- Search or scroll down to look for the Newforma Konekt app.
- On the Newforma Konekt page, click Install.
Step 2 – Configure the Procore connector in Newforma Konekt
In order to have synchronized RFIs and Submittals with a Procore project, a Newforma Konekt project administrator can configure the connector settings from the RFIs or Submittals page.
This is the user who will receive submittals and RFIs in Newforma Konekt. The user must also be on the Procore project to link.
- In Newforma Konekt, open the desired project.
- In the main menu, under Project menu, select RFIs or Submittals.
- Click on the Connector Settings at the top-right corner of the page.
- A pop-up window opens to connect to Procore. If the pop-up window doesn’t open, your browser might have blocked it. Check for a message about a pop-up being blocked in your browser, and click Allow to allow pop-ups for the website.
- On first connection, you must allow the website to connect to Procore. Then, enter your Procore account email address and password. If you are already connected to Procore in the browser, you will not be asked for your credentials.
- The Procore connection configuration form should now open. Select the Procore Company and Project to link.
- When you’re done, click Next to configure the mappings and options for the connection.
- For submittals, map Newforma Konekt responses to equivalent Procore statuses and select the purpose field for incoming submittals.
- For RFIs, select the RFI type field for incoming RFIs and specify what happens when a responded RFI is reassigned to a user in Procore. The following options are available:
- Do nothing – This will not reopen RFI’s in Newforma Konekt and will not automatically respond back to the Procore project.
- Automatically reopen – This will perform a re-open action on the RFI in Newforma Konekt, automatically bringing in new comments from the item in Procore.
- Auto message response – This option will automatically respond with a pre-defined message back to Procore when an open RFI is reassigned to the ball in court user. This is used when a project team is not accepting re-opened RFI’s from the external project team. The message can be customized but we have also provided a default option as well.
- Review the summary and click Connect project.
- In the Enable real-time syncing dialog, copy the link and send it to the Procore admin on the connected project so they can enable the feature.
Step 3 – Enable real-time syncing in your browser
April 15, 2024 Update: We’ve changed the way of configuring the connection between Procore and Newforma Konekt. For more information, see New and Improved Features in Newforma Konekt. If you have already manually configured a webhook, you will still see the option to enable real-time syncing, even though it may already be enabled in Procore.
The Procore administrator can complete the real-time connection with the link provided by the Newforma Konekt administrator.
- Paste the link sent to you into your browser and click Enable.
- A new tab opens to connect to Procore.
- Once connected, the page will indicate that the real-time syncing has been activated.
Step 4 – Create and receive RFIs and submittals
Once the connector is configured, you can start creating RFIs and submittals in Procore. When an RFI or Submittal is assigned to a Ball in court user, the item is automatically transferred from Procore to Newforma Konekt as Pending. Any already in progress submittals or RFIs cannot be returned to Procore.
The following diagram shows an overview of the Procore to Newforma Konekt workflow for RFIs and submittals.
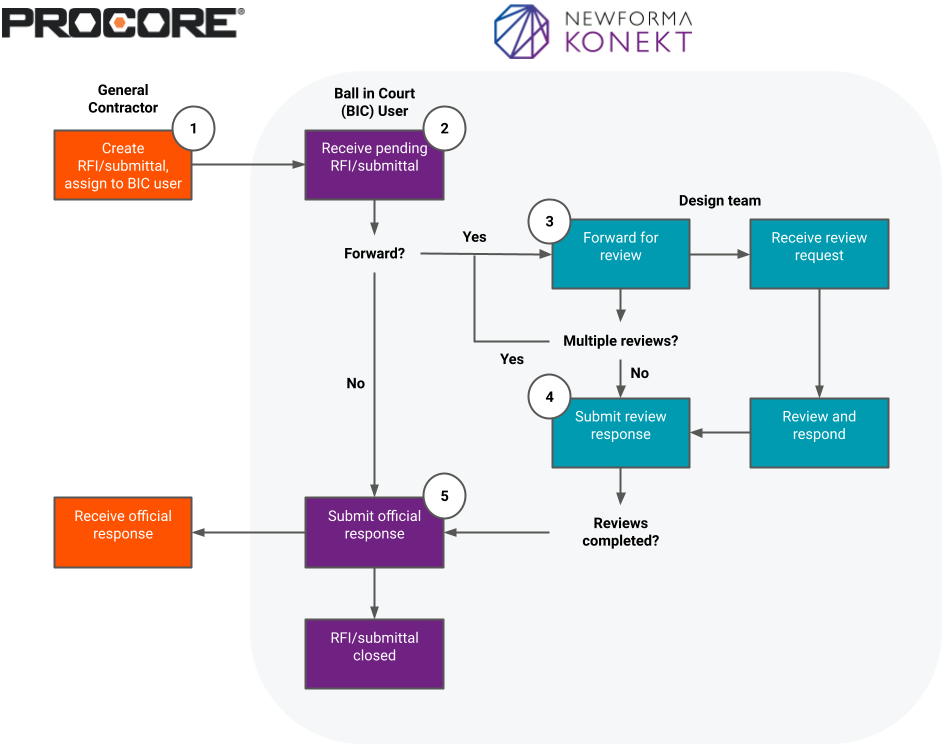
- The general contractor creates an RFI/submittal in Procore, automatically syncs in Newforma Konekt. When sending the submittal or RFI from Procore, the contractor needs to select the design team member set up during configuration (Ball in court user) to receive items as the Ball In Court assignee. Note that the Ball in Court assignee must also be on the Newforma Kionekt team for the project.
- The RFI/submittal sent from Procore appears in Newforma Konekt as Pending. The Ball in Court user receives the RFI/submittal. Note that the due date is set based on the default due date configured in Project Settings.
- The RFI/submittal is in an Open status and can be forwarded for review to the design team.
- The design team completes the review process. will return the submittal or RFI to Procore.
- The official response is provided and automatically sent to the GC in Procore. CG reviews design team’s answer in Procore. Ball In Court is back to the contractor realm.
For more information on the review process, see the RFIs and Submittals section.
Congratulations! You now know how to configure and get started with the Procore connector.
See also
You have the ability file emails as RFIs and submittals using the Outlook add-in (see File Emails from Outlook to Newforma Konekt). However, only submittals/RFIs received via Procore can be returned to Procore.