Newforma Konekt for Outlook: Getting Started Tutorial
The Newforma Konekt Outlook Add-in allows project team members to file emails to Newforma Konekt directly from Microsoft Outlook.
In this tutorial, you’ll learn how to install and configure the Newforma Konekt add-in in order to start filing emails to Newforma Konekt.
What you’ll need
In order to utilize the Newforma Konekt Outlook Add-in the following is required:
- A Newforma Konekt account and a Microsoft 365 account.
- At least an Editor role for the project (see Project Roles)
- Access to the email module (see Edit Project Email Settings).
Step 1 – Install the Newforma Konekt add-in in Outlook
The add-in can be installed from a file.
- Right-click on the following link, select “Save link as” to save the file to your computer. https://newforma-konekt-outlook-addin.pimtrackapp.co/manifest.xml
- In Outlook, click Get add-ins from the Home tab in the ribbon. In your preferred browser, you can also go to https://aka.ms/olksideload to open the Add-Ins for Outlook dialog.
- In the Add-ins for Outlook dialog box, select My add-ins from the left panel.
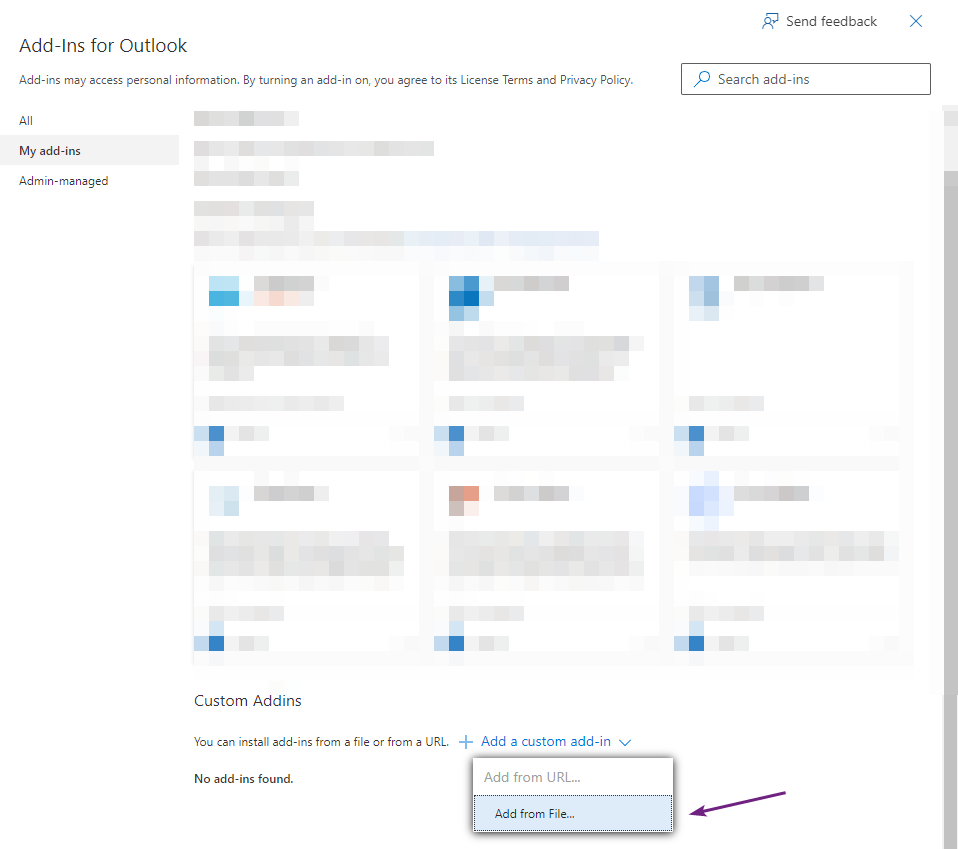
- Scroll to the bottom of the My add-ins list to Custom Add-ins. Click Add a custom add-in and select Add from File… from the dropdown menu to select the .xml file you saved in Step 1.

If you still have difficulty installing the add-in, please refer to this article.
Step 2 – Make the Newforma Konekt add-in icon always available
Once the add-in is installed you can customize Outlook so that the Newforma Konekt add-in icon is always available when opening and composing an email.
- In Outlook, click Settings in the top-right corner, then click View All Outlook settings.
- Click Mail, then click Customize actions.
- Select the check box for Newforma Konekt in the Message surface section.
Step 3 – Launch the Newforma Konekt add-in
To launch the add-in, follow these steps:
- Open an email you want to file.
- Click the Newforma Konekt icon to launch the add-in.
- In the Newforma Konekt panel, click Sign in with Microsoft.
- In the dialog box that appears, select your company-issued account to sign in.
When signing in for the first time, you will be required to grant consent to specific permissions needed for the functionality of the application.
Some organizations may even prevent individual users from granting consent to applications. A Microsoft Admin will have to grant consent on their behalf.
Step 4 – Configure Newforma Konekt add-in settings
The Newforma Konekt add-in settings options allow you to configure how emails are filed in Newforma Konekt
- Sign in to Newforma Konekt and click the three dots icon to access the settings. You can pin the Newforma Konekt pallet by clicking the pin icon in the top-right corner.
- From the settings, you can enable the File all past emails in a conversation option to include all previous emails in conversations.
- When you’re done, click Back.
Congratulations! You’re now ready to file emails to Newforma Konekt.
Optional – Centralized Deployment via Microsoft 365 Admin Center
To access the Microsoft 365 Admin Center, sign into Microsoft 365 and select the Admin tile.
- Within the Microsoft 365 Admin Center, select Settings > Integrated apps.
- Click Upload custom apps.
- From the App type dropdown, select Office Add-in.
- Select the radio button to provide a link to a manifest file and input the following URL:
https://newforma-konekt-outlook-addin.pimtrackapp.co/manifest.xml - Click Next to begin processing the manifest file.
- Specify who has access:
- Everyone
- Specific Users/Groups
- Just Me
- Click Next and Finish Deployment to deploy the add-in.
- A Deployment Status window appears. Click Next, then Close to complete the operation and close the window.
