

Align a Sheet to a Model in the NextGen Viewer
In the NextGen Viewer, you can position a PDF sheet on top of a model so that 2D and 3D information line up. Three tools adjust the sheet’s placement:
- Translate moves the sheet.
- Rotate turns it.
- Fit scales it from two pinpoints to match points on the model.
Sheets published through the Revit add-in are already fitted to the models published with them. Aligning is mainly useful for sheets you upload manually as PDF files, but the option is available for all sheets.
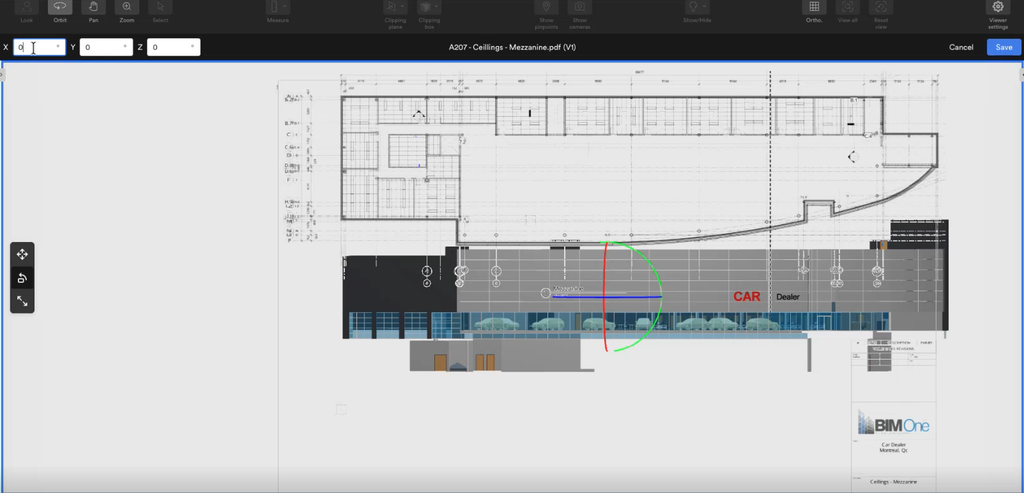
Step 1: Open the Sheet in Edit Mode
To align a sheet, you first open it in edit mode on top of a model.
To open a sheet in edit mode:
- In the viewer, turn on the model you want to align the sheet to.
- Open the Sheets tab.
- Click (…) button next to the sheet.
- Select Edit in viewer.
The sheet opens on top of the model, and its file name appears above the viewing area. The translate, rotate and fit tools appear as icons in a toolbox on the left.
The Orbit, Pan and Zoom tools and the Persp. toggle remain available in the toolbar while you edit. .
Step 2: Adjust the Sheet’s Placement
In edit mode, three tools adjust the sheet’s placement on the model: translate, rotate and fit. Use them in any order and switch between them as often as needed until the sheet lines up with the model.
Move the Sheet
The translate tool moves the sheet along the X, Y and Z axes, so you can bring it close to its position on the model.
To move the sheet:
- Select the translate tool.
- Do one of the following:
- Drag the red, green or blue axis of the gizmo to move the sheet along that axis.
- Enter values in the X, Y and Z fields above the viewing area.
The sheet moves to the new position. The fields show the unit next to each value, such as m for meters. To adjust a value in small steps, click in the field and press the up or down arrow key.
Rotate the Sheet
The rotate tool turns the sheet around the X, Y and Z axes, so you can correct its angle or stand it upright against the model.
To rotate the sheet:
- Select the rotate tool.
- Do one of the following:
- Drag the rotate gizmo.
- Enter angles in degrees in the X, Y and Z fields above the viewing area.
The sheet turns to the new angle. By default, the rotation values are X: -90, Y: 0 and Z: 0. Enter these values to return the sheet to its original angle.
Fit the Sheet to the Model
The fit tool scales the sheet from two pinpoints, so that points on the sheet meet the matching points on the model. The scaling isn’t proportional: the sheet can stretch in any direction to match a model whose footprint differs from the PDF file.
To fit the sheet:
- Select the fit tool. Two cone-shaped pinpoints appear at opposite corners of the sheet.
- Drag a handle onto a point of the sheet that you can also find on the model, such as an outside corner of the building. For precise placement, zoom in and view the handle from directly above.
- Press Ctrl (Command on Mac) and drag the pinpoint onto the matching point of the model.
- Repeat steps 2 and 3 with the other pinpoint.
The sheet scales to match the model. While you drag one pinpoint, the opposite pinpoint stays in place and acts as the pivot point. To refine the fit, repeat the steps using other corners of the building.
Step 3: Save the Sheet’s Placement
Saving keeps the sheet’s placement on the model for the current sheet and its later revisions.
To save the placement, click Save. To exit edit mode without keeping your changes, click Cancel.
The saved placement applies to every revision of the sheet uploaded with the exact same file name. A sheet uploaded under a different name, for example with “V2” added, appears as a new sheet without a saved placement, and you need to align it again.
A sheet published from Revit doesn’t replace a manually uploaded sheet, even when both have the same name. The published sheet appears as a separate entry in the Sheets tab, without the saved placement. To tell the two entries apart, compare their update dates.