
Manage the CP Workflow
How you process a change proposal in Newforma Konekt depends on what the status is (Open, In review, Reviewed, etc.), and what your project role is (Creator/Admin, Editor, Reader, or Reviewer).
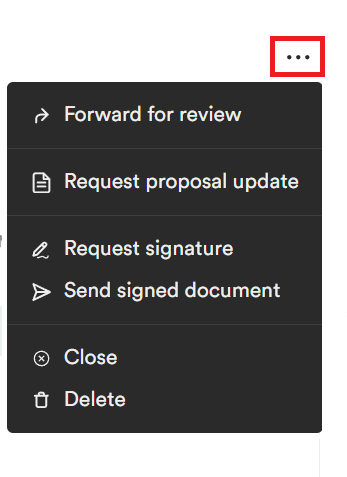
For example, as a project admin or editor, you can choose to forward an Open change proposal for review to other project team members, request a proposal update, request a signature, or send the proposal. Project admins and editors can also close change proposals.
Receive a pending CP
When a CP is created, the status is Pending. Once the item has been received by the architect in Newforma Konekt, your team can complete their standard workflow.
- In Newforma Konekt, open the desired project.
- In the main menu, under Project menu, select Change management.
- In the Change management page, find the pending CP that need to be received. You can filter by status to see all pending CPs.
- Click the CP to open it and then click the three dots > Receive.
- From the dialog box that opens, you can modify the information and add attachments as needed.
- When you’re done, click Receive. Once the item has been received, the status changes to Open and your team can complete their standard workflow.
If for any reason you want to delete the CP, click the three dots > Delete.
Forward a CP for review
You can forward a CP to other project team members for review to capture the final agreed changes for the contract sum and contract time.
- In Newforma Konekt, open the desired project.
- In the main menu, under Project menu, select Change management.
- In the Change management page, find the CP for which you want to forward for review.
You can select CP at the top of the list to display only the change proposals and then use the filter and sort options to find the CP more easily. You can also search for CPs using the search bar. - Click the CP to open it and then click the three dots > Forward for review.
- From the dialog box that opens, complete the information as needed. Required fields are indicated by an asterisk (*).
Field Description Review due date Select a date from the calendar for the CP review to be due. By default, the date is 3 days from the current date. To* Select the project team member(s) that will be responsible for reviewing the CP. Cc Select other project team member(s) to forward the CP to. Remarks Enter any remarks about the CP. - To include any additional files with the CP, click Browse or drag and drop the desired files.
- When you’re done, click Forward. The status will change to In review and an email notification will be sent to users in the To and Cc fields.
When a CP has been reviewed by all forwarded parties, the status will change to Reviewed. You can see who reviewed the CP under the Details tab.
Submit a review response for a CP
You can submit a review response to a change proposal that has been forwarded for review.
- In Newforma Konekt, open the desired project.
- In the main menu, under Project menu, select Change management.
- In the Change management page, find the CP you want to respond to. If you have a Reviewer role, you will only see the CPs that have been forwarded to you.
You can use the search, filter, and sort options to find your CP more easily. CPs awaiting review will have a In review status. - Click the CP to open it and then click the three dots > Submit response.
- From the dialog box that opens, complete the information as needed. Required fields are indicated by an asterisk (*).
Field Description Action* The action taken on the change proposal. Select one of the following options from the drop-down list. - Reviewed as noted
- Reviewed
- No exceptions
- Rejected
- Revise and resubmit
From* Select the project team member who responded to the CP. By default, your name is entered in this field. To* Select the project team member(s) that will be responsible for reviewing the response. Cc Select other project team members to submit the review response to. Response Enter your response. - To include any additional files with the CP, click Browse or drag and drop the desired files.
- When you’re done, click Submit. An email notification will be sent to users in the To and Cc fields.
Request a proposal
- In Newforma Konekt, open the desired project.
- In the main menu, under Project menu, select Change management.
- In the Change management page, find the desired CP.
- Click the CP to open it and then click the three dots > Request proposal.
- From the dialog box that opens, complete the information as needed. Required fields are indicated by an asterisk (*).
Field Description From* Select the project team member who is requesting the proposal. By default, your name is entered in this field. To* Select the project team member to send the proposal request to. You can also enter an email address in this field. Cc Select other project team members to send the proposal request to. You can also enter email addresses in this field. Purpose* Select the purpose of the PR from the drop-down list. - For information only
- For construction
Remarks Enter any comments about the PR. - To include any additional files with the proposal, click Browse or drag and drop the desired files.
- When you’re done, click Request. The status will change to Pending proposal and an email notification will be sent to users in the To and Cc fields.
Make a Request a proposal update
Given that a proposal request has been made on a CP and the the proposal has been received, if a user wants to make another proposal to update the old one, they can make a Request proposal update, by following the steps below:
- In Newforma Konekt, open the desired project.
- In the main menu, under Project menu, select Change management.
- In the Change management page, find the desired CP.
- Click the CP to open it and then click the three dots > Request proposal update.
- From the dialog box that opens, complete the information as needed. Required fields are indicated by an asterisk (*).
Field Description From* Select the project team member who is requesting the proposal update. By default, your name is entered in this field. To* Select the project team member to send the proposal update request to. You can also enter an email address in this field. Cc Select other project team members to send the proposal update request to. You can also enter email addresses in this field. Purpose* Select the purpose of the PR update from the drop-down list. - For information only
- For construction
Remarks Enter any comments about the PR. - To include any additional files with the proposal, click Browse or drag and drop the desired files.
- When you’re done, click Request. The status will change to Pending proposal and an email notification will be sent to users in the To and Cc fields.
Submit a proposal
Proposals are the contractor’s response to a proposal request (PR). They include pricing, schedule adjustments, and other relevant details to support the decision-making process.
- In the Change management page, find the CP for which you want to submit a proposal. CPs awaiting a proposal will have a Pending proposal status.
- Click the CP to open it and then click the three dots > Submit proposal.
- From the dialog box that opens, complete the information as needed. Required fields are indicated by an asterisk (*).
Field Description From* Select the project team member or contact the PR came from. By default, your name is entered in this field. Received via* Select the method in which the PR was received from the drop-down list. - Phone
- Other
Received date* Select the date the PR was received. Sender number Enter the number of the change proposal. To* Select the project team member(s) to submit the proposal to. Cc Select other project team members to submit the change proposal to. You can also enter email addresses in this field. Proposed total amount Enter the proposed total amount for the proposal and select a currency. Proposed total days Enter the proposed number of days the change proposal would take. Remarks Enter any comments about the proposal. - To include any additional files with the proposal, click Browse or drag and drop the desired files.
- When you’re done, click Submit. The status will change to Proposal received and an email notification will be sent to users in the To and Cc fields.
After you submit the proposal, the design team can review and advise the owner.
Request a signature
- In Newforma Konekt, open the desired project.
- In the main menu, under Project menu, select Change management.
- In the Change management page, find the CP for which you want to request a signature.
- Click the CP to open it and then click the three dots > Request signature.
- From the dialog box that opens, complete the information as needed. Required fields are indicated by an asterisk (*).
Field Description From* Select the project team member who is requesting the signature. By default, your name is entered in this field. To* Select the project team member to send the signature request to. You can also enter an email address in this field. Cc Select other project team members to send the signature request to. You can also enter email addresses in this field. Remarks Enter any comments about the action. - To include any additional files with the proposal, click Browse or drag and drop the desired files. An attachment is required.
- When you’re done, click Request. The status will change to Pending signature and an email notification will be sent to users in the To and Cc fields.
You can cancel a signature request by clicking the three dots > Cancel signature request.
A proposal can be ‘Approved’ or ‘Rejected’. Rejection may occur if all items in the proposal request are not covered.
Submit a signature response for a proposal
You can submit an ‘Approved’, ‘Rejected’ or ‘Revise and resubmit’ signature response.
- In the Change management page, find the PR for which you want to submit a signature response. PRs awaiting a signature will have a Pending signature status.
- Click the PR to open it and then click the three dots > Submit signature response.
- From the dialog box that opens, complete the information as needed. Required fields are indicated by an asterisk (*).
Field Description Response* Select one of the following options from the drop-down list. - Approved
- Rejected
- Revise and resubmit
From* Select the project team member or contact the signature request came from. To* Select the project team member(s) to submit the signature to. Cc Select other project team members to submit the signature to. You can also enter email addresses in this field. Remarks Enter any comments about the proposal. - To include any additional files with the response, click Browse or drag and drop the desired files.
- When you’re done, click Submit. The status will change to Proposal approved or Proposal rejected and an email notification will be sent to users in the To and Cc fields. Both a ‘Rejected’ and ‘Revise and resubmit’ responses will put the PR into a Proposal rejected state.
Send a signed document
Change proposals are automatically closed when you send the signed document to the people affected by the changes.
- In the Change management page, find the CP for which you want to send the signed document.
- Click the CP to open it and then click the three dots > Send signed document.
- From the dialog box that opens, complete the information as needed. Required fields are indicated by an asterisk (*).
Field Description From* Select the project team member who is sending the signed document. By default, your name is entered in this field. To* Select the project team member(s) to send the signed document to. You can also enter email addresses in this field. Cc Select the project team member(s) to send the signed document to. You can also enter email addresses in this field. Purpose* Select one of the following options from the drop-down list. - For information only
- Recommendation
- Other
Remarks Enter any comments about the proposal. - To include any additional files with the proposal, click Browse or drag and drop the desired files. An attachment is required.
- When you’re done, click Send. The status will change to Closed and an email notification will be sent to users in the To and Cc fields.
Close a CP manually
You can close a CP manually for tracking purposes. Closing means there is no other work that needs to happen with the change proposal.
- In the Change management page, find the CP you want to close.
- Click the CP to open it and then click the three dots > Close.
- From the dialog box that opens, complete the information as needed. Required fields are indicated by an asterisk (*).
Field Description Action* Select one of the following options from the drop-down list. - Void
- No action taken
Remarks Enter any comments about the action. - To include any additional files with the CP, click Browse or drag and drop the desired files.
- When you’re done, click Close. The status will change to Closed.
Reopen a closed CP
- In the Change management page, find the closed CP you want to reopen. Filter CPs by status.
- Click the CP to open it and then click the three dots > Reopen CP.
- From the dialog box that opens, complete the information as needed. Required fields are indicated by an asterisk (*).
Field Description Reopen date* Select a date from the calendar the CP was reopened. By default, the reopen date is set to the current date. Due date Select a date from the calendar for the CP to be due. From* Select the project team member or contact who is reopening the CP. By default, your name appears in this field. To* Select the project team member(s) that will be responsible for the CP. Remarks Enter any comments about the CP. For example, you can specify the reason for reopening the CP. - To include any additional files with CP, click Browse or drag and drop the desired files.
- When you’re done, click Reopen. The status will change to Open and an email notification will be sent to users in the To field.