Publish Revit Models Directly to the Web Viewer
3 minutes
3 years ago
After updating a model, use the Publish feature to send a model to the Web Viewer directly from Revit without having to export the IFC, send it to the appropriate person, and then upload it into the viewer. Folders in the Project Tree receive the multiple revisions that will be published. The model can be published manually or be scheduled to be sent at predetermined times.
Follow the instructions below or watch this short video.
- In the ribbon, click Newforma Konekt tab > Publish.
- In the Publish IFC Models portion, select the view to export.
- Go to the Append tab to select the model to add a revision to.
- Click OK.
- Under the model name, in the Create model tab, select an existing folder that you created specially for your model.
- In the Append tab, select the model to which you want to add a revision.
- Click Publish.
- A dialog box saying that the IFC export is completed will appears. Click OK.
- In Newforma Konekt, open the viewer and click the Project tree tab.
- Click the arrow at the right of your IFC file, and select Manage revisions.
- Select your new revision and click Save to upload the model.
- Turn it on. You’ll see your model has been publish to the appropriate location and that your changes have been saved.
Scheduled Publishing of Models
Follow the instructions below or watch this short video.
- In the ribbon, click Newforma Konekt tab > Publish.
- In the Publish IFC Models portion, select the view to export.
- Under the model name, in the Create model tab, select an existing folder that you created specially for your model.
- If there is an existing model in the viewer we need to append it to the existing IFC, in the Append tab, select the model to which you want to add a revision. This will allow us to switch between model revisions and stop us from uploading multiple IFC files. We will be able to switch between the model revisions.
- You can also publish your PDF sheets.
- In the Publish PDF Sheets portion, click the Modify Setup button.
- Select the sheet(s) you want to export to the viewer.
- Click OK.
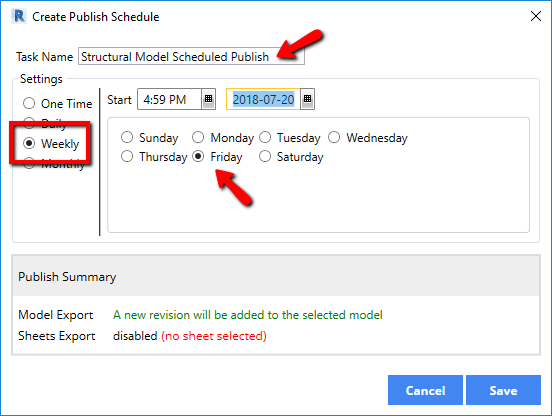
- Click the schedule button at the bottom of the dialog box to open the Create Publish Schedule dialog box. Give your task a name, select the frequency you want this publish to take place, and select the time conditions. You’ll notice below that our model will be published at the end of the week, every Friday at 4:59pm.

- Review your publish summary and then click the Save button to create this automated task. You will be prompted with a “task successfully created” dialog box. Click OK to close the Publish to Newforma Konekt dialog box
Your model will now be published automatically to the Web Viewer at the next scheduled date and time.
