
Auto-Filing Folders in Outlook
Requirements:
- General Outlook Add-in Requirements can be found here
- For Auto-Filing Folders:
- Outlook Add-in Manifest Version 1.1.0 or above
- To find out what Manifest version you are on, see your Outlook add-in settings.
- New manifest version URLs can be found here
- Outlook Add-in Manifest Version 1.1.0 or above
Auto-Filing Folders in Outlook
Auto-filing folders in Outlook lets you quickly file emails to projects by dragging messages from your inbox into project-named folders. Once configured, these folders automatically send emails to the correct project—no extra steps required.
How Auto-Filing Folders Work
- Auto-filing folders are created inside your Outlook inbox.
- Each folder is named exactly the same as a project.
- When you drag an email from your inbox into one of these folders, the email is automatically filed to the associated project.
This makes auto-filing folders ideal for users who prefer organizing emails by folders instead of using the add-in panel.
Configure Auto-Filing Folders
Before you can use auto-filing folders, you must configure them in the Outlook Add-in settings.
- Open Outlook.
- Open the Newforma Konekt Outlook add-in.
- Go to your Outlook Add-in Settings.
- Select Configure auto-filing folders.
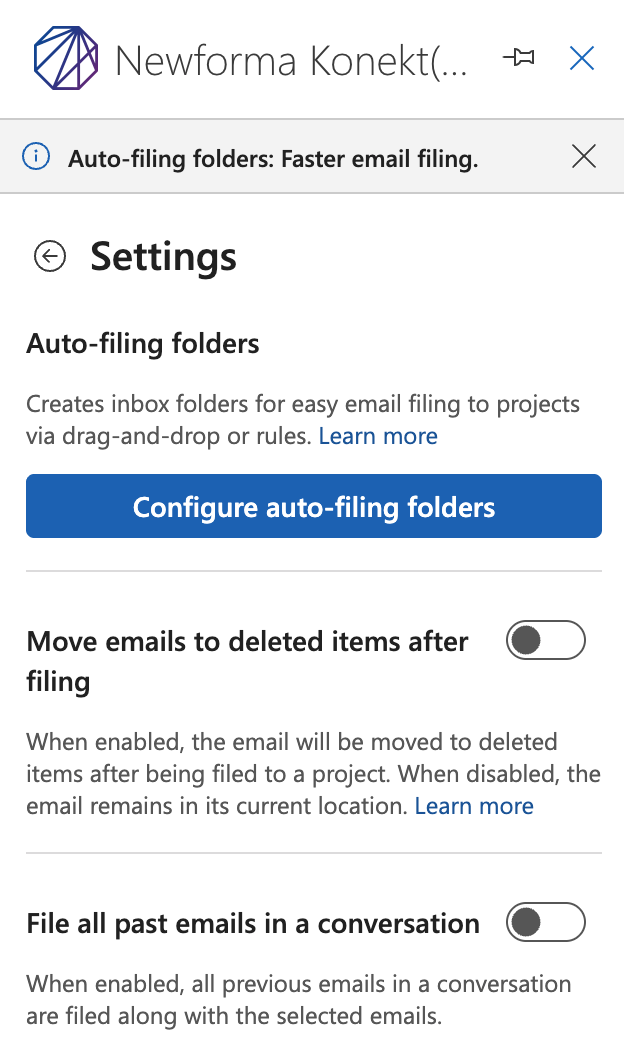
- Choose the projects you want folders created for.
- Note: only 50 project folders can be created at a time
- Select Save at the bottom of the Add-in.
Once configured, Outlook automatically creates the folders automatically in your inbox.
Important Notes
If the folders do not appear in Outlook
After configuring Auto-Filing Folders, Outlook may need to refresh before the folders appear in your inbox.
If you do not see the folders:
- Refresh your mailbox in Outlook.
- Collapse and expand your Inbox.
- Restart Outlook if necessary.
Once refreshed, the Auto-Filing Folders should appear in your Inbox folder list.
Do not delete Auto-Filing Folders manually
Auto-Filing Folders are managed by the Outlook Add-in settings. If you delete these folders directly from Outlook, it may cause unexpected behavior or prevent proper synchronization.
To remove Auto-Filing Folders, always use the Outlook Add-in Settings and disable or remove them from there.
Filing Emails Using Auto-Filing Folders
After setup is complete:
- Go to your Inbox in Outlook.
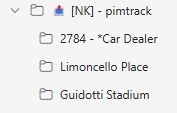
- Locate the project folder. The project folder will be contained within a specific hub folder, labelled [NK] – HUBNAME, if you create folders for projects in different hubs, they will be organized at the hub level.
- Drag an email from your inbox into the project folder.
- The email is filed to the project automatically.
- Depending on your settings, emails will either go to the deleted items folder or stay in the filed Project Folder
No additional confirmation or filing steps are required.
Removing and Archiving Auto-Filing Folders
To remove Auto-Filing Folders:
- Open Outlook.
- Open the Newforma Konekt Outlook add-in.
- Go to your Outlook Add-in Settings.
- Select Configure auto-filing folders.
- Choose the projects you want to remove the previously created folders.
- Select Save at the bottom of the Add-in.
Once configured, Outlook automatically removes the folders from your inbox.
Depending on the user’s deletion settings, emails may still be in the project folder. If the Project Folder contains messages, the folder will be moved to a new hub Archive Folder
These archive folders are read-only, meaning new emails will not be filed to the project if messages are moved/copied into the folder.
Archived folders can be identified by the red image to the left of the folder as well as the [NK Archive] label on the hub level.
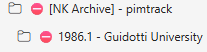
Please note that archived projects can be reopened, and the original folder will move back to an active folder from its current archive state.
Limits and Important Notes
- You can have a maximum of 500 auto-filing folders in your inbox.
- You can configure up to 200 folders at a time.
- Auto-filing folders are designed to help manage large volumes of project emails efficiently.
Best Practices
- Configure folders only for active projects to stay within folder limits.
- Periodically review and remove folders for completed projects.
- Use auto-filing folders alongside the Outlook add-in for maximum flexibility.